目录
前言
结束了UE基础的学习,开始下一步了;
综合咨询项目组内顶尖程序以及AI后,整理了份路线,接下来大概按 输入 > 角色移动 > 动画 > 相机 > 整合 这个顺序往下走。
这篇是前两站的笔记整理,想搞清楚的事情就一件:从按下按键,到角色实际动起来,中间经过了哪些东西。
读的是 5.6.1 的源码版引擎,工程是第三人称模板改的,只走了主干,很多分支是跳过的,后面会说。
几份主要参考的官方文档:
增强输入、移动组件、Character、设置角色动作。
增强输入 Enhanced Input
FVector 是啥
先提这个,是因为后面会看到同一个 FVector 在链路上不停换身份。
简单来说就是包含三个浮点数的struct(结构体),包含xyz,本身没有任何意义;
它的表现取决于被传给了谁,比如说位置、方向、速度、力等。
顺带一提,UE5 里这三个分量是 double 不是 float,MathFwd.h 里写的是 using FVector = UE::Math::TVector<double>;
UE5 为了支持大世界坐标,把精度整体提上去了。
输入动作 Input Action
本质是数据资产(配置),可以理解为IA是”玩家意图”;
比如说IA_Jump,是跳跃,但是可以通过多种按键触发,比如说键盘空格、手柄A键等;
通过IA,可以把「动作」与「按键」解耦。
IA 身上有个值类型 EInputActionValueType,决定这个意图携带什么数据,一共四种:
- Boolean 是开关,只有按下和松开,跳跃、蹲下、冲刺这类操作用它。
- Axis1D 是一个 float,适合油门大小这种单轴模拟量。
- Axis2D 是一个 Vector2D,角色移动用的就是它,WASD 或者左摇杆,X 和 Y 分别是左右和前后。
- Axis3D 是一个 Vector,用于运动控制器位置这类三维输入,VR 和飞行会用到。
源码在 Engine\Plugins\EnhancedInput\Source\EnhancedInput\Public\InputAction.h,可以看到 UInputAction : UDataAsset,IA 的本质就是个 DataAsset。
Modifier、Trigger 与触发状态
所有的IA都有自带的触发状态属性,定义在 InputTriggers.h 的 ETriggerEvent 里:
enum class ETriggerEvent : uint8
{
    None        = (0x0)     UMETA(Hidden),
    Triggered   = (1 << 0), // ETriggerState (None -> Triggered, Ongoing -> Triggered, Triggered -> Triggered)
    Started     = (1 << 1), // ETriggerState (None -> Ongoing, None -> Triggered)
    Ongoing     = (1 << 2), // ETriggerState (Ongoing -> Ongoing)
    Canceled    = (1 << 3), // ETriggerState (Ongoing -> None)
    Completed   = (1 << 4), // ETriggerState (Triggered -> None)
};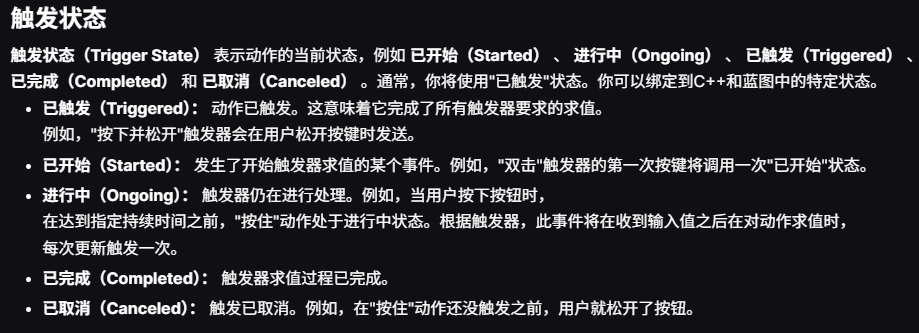
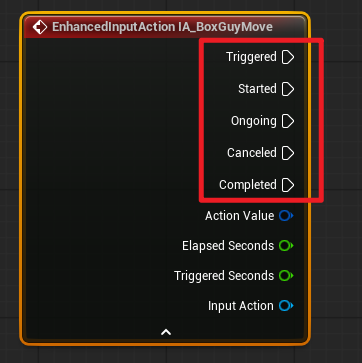
可以通过选择接收不同的状态,来响应对应的事件。
而 Trigger 决定了 IA 如何进入上述这些状态。若配置为 None,默认按下后立刻触发,并且按住期间只要值不为零,每一帧都是 Triggered。
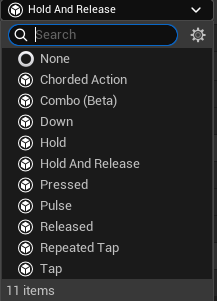
以 Hold 举个例子,Hold Time Threshold 配置为 1.0,这个 IA 的触发状态流转是这样的:
- t=0.0s,玩家按下空格:Started(已开始)
- t=0.1s,按键仍被按住:Ongoing(进行中)
- t=1s,到达 1 秒阈值:Triggered(已触发),跳跃动作正式执行
- t=1.5s,玩家松开空格:Completed(已完成)
如果没到 1 秒就松手,那就是 Canceled。
在 Trigger 之前其实还有一道工序,就是修饰器 Modifier。它会先修改硬件设备的原始输入信号,再传给 Trigger。经常用到的场景包括:
- 调整手柄摇杆死区,避免误触
- 调整输入灵敏度
- 输入取反,实现视角上下翻转
- 朝向转换,使角色移动方向相对于相机而不是世界坐标轴
可选的修饰器种类也很多,后续用到再了解吧(
输入映射上下文 Input Mapping Context
负责映射这一件事,本质是多个IA以及对应按键的集合,类似一个按键配置表。
官方文档的说法是:
输入映射上下文(Input Mapping Contexts) 是输入动作的集合,表示玩家可以处于的特定上下文。它们描述了给定输入动作的触发规则。映射上下文可以动态地为每个用户添加、移除或安排优先次序。
将多个IA集合成IMC,方便角色在不同状态下,直接切换或叠加整套控制方案,而不用逐个重新映射按键。
源码注释:
/**
* UInputMappingContext : A collection of key to action mappings for a specific input context
*/
IMC 中同样可以给 IA 配置修饰器和触发器。
我原本以为 IMC 里的配置优先级高于 IA,IA 上的配置是”全局默认值”,IMC 里的配置是”针对特定按键的局部覆盖”,IMC 中有配置就优先按 IMC 的来。
后来读源码发现不是覆盖,是叠加,EnhancedActionKeyMapping.h 里 Modifiers 上方的注释写得很明确:
/**
* Modifiers applied to the raw key value.
* These are applied sequentially in array order.
*
* Note: Modifiers defined in individual key mappings will be applied before those defined in the Input Action asset.
* Modifiers will not override any that are defined on the Input Action asset, they will be combined together during evaluation.
*/
也就是说,IMC 里那条映射上的 Modifier 先执行,IA 上的再叠在它的结果上执行。Trigger 也分两层:先算映射上的,再算 IA 上的。如果映射上配过 Trigger,最终状态取两层里较低的那个(EnhancedPlayerInput.cpp):
TriggerState = ActionData.TriggerStateTracker.EvaluateTriggers(this, ActionData.Triggers, ActionData.Value, NonDilatedDeltaTime);
TriggerState = ActionData.TriggerStateTracker.GetMappingTriggerApplied() ? FMath::Min(TriggerState, PrevState) : TriggerState;
所以两边都配了 Trigger,就得两边都通过。
Description 是给人看的备注,可以说是IMC的注释,对应成员 ContextDescription。
Registration 下面只有一个 RegistrationTrackingMode,管的是同一个 IMC 被多次 AddMappingContext 时怎么算:默认的 Untracked 不计数,第一次 Remove 就直接移除;CountRegistrations 会计数,Add 几次就得 Remove 几次。
玩家自定义按键则是 IA 上的 PlayerMappableKeySettings,这个简单了解下,用到再学。
资产背后的类
配置看完了,接着翻翻源码,看看这几个资产背后是什么。
先是 InputAction,路径 \Engine\Plugins\EnhancedInput\Source\EnhancedInput\Public\InputAction.h:
UCLASS(MinimalAPI, BlueprintType)
class UInputAction : public UDataAsset
继承了 DataAsset,IA 本质就是 DataAsset。
同一个文件里有个枚举,决定多个按键同时映射到同一个 IA 时最终值怎么算,取绝对值最大,或者全部相加:
enum class EInputActionAccumulationBehavior : uint8
{
    /** Take the value from the mapping with the highest Absolute Value. */
    TakeHighestAbsoluteValue,

    /** Cumulatively adds the key values for each mapping. */
    Cumulative,
};
默认是 TakeHighestAbsoluteValue:给 -0.3 和 0.5,结果取 0.5。Cumulative 是相加:-0.7 和 +0.75 得到 0.05。引擎注释里举的例子正好是 WASD,如果希望同时按 W 和 S 时互相抵消,就该用这个。
类注释最后一行值得注意:
* Note: These are instanced per player (via FInputActionInstance)运行游戏时,UE 会为每个玩家创建一个 IA 的运行时实例:
- UInputAction:是你在编辑器里创建的那个资产(比如 IA_Move),它定义了”这是什么操作”(值类型、触发器默认值等),是静态的模板,存放在磁盘上,供美术/策划配置。
- FInputActionInstance:是游戏运行时,UE 为这个资产在具体玩家身上创建的动态实例,它记录了”这个操作当前的值是多少”、“状态是 Ongoing 还是 Completed”,活在内存中,供程序运行时读写。
这是一种典型的”数据与逻辑分离”的设计模式。存在多个玩家的时候,每个玩家的当前 IA 状态都不同,为每个玩家创建自己独有的实例,就能避免混淆。这些实例存在 UEnhancedPlayerInput 里:
mutable TMap<TObjectPtr<const UInputAction>, FInputActionInstance> ActionInstanceData;FInputActionInstance 上则是获取当前 IA 状态的一堆方法,以及添加/移除 Trigger 的方法:
ETriggerEvent GetTriggerEvent() const { return TriggerEvent; }
UE_API FInputActionValue GetValue() const;
float GetElapsedTime() const { return ElapsedProcessedTime; }
float GetTriggeredTime() const { return ElapsedTriggeredTime; }
// ...
void AddInputTrigger(UInputTrigger* InputTrigger) { Triggers.Add(InputTrigger); }
void RemoveInputTrigger(UInputTrigger* InputTrigger) { Triggers.Remove(InputTrigger); }
然后是 IMC,路径 Engine\Plugins\EnhancedInput\Source\EnhancedInput\Public\InputMappingContext.h,同样继承自 UDataAsset,本质也是 DA。它最重要的成员是一个数组:
UPROPERTY(config, BlueprintReadOnly, EditAnywhere, Category = "Mappings")
TArray<FEnhancedActionKeyMapping> Mappings;
也就是说,IMC 本质是 EnhancedActionKeyMapping(由 Key 和 IA 组成)的数组。另外还有一堆修改 IMC 配置的方法:
UFUNCTION(BlueprintCallable, Category = "Mapping")
UE_API FEnhancedActionKeyMapping& MapKey(const UInputAction* Action, FKey ToKey);

UFUNCTION(BlueprintCallable, Category = "Mapping")
UE_API void UnmapKey(const UInputAction* Action, FKey Key);

UFUNCTION(BlueprintCallable, Category = "Mapping")
UE_API void UnmapAllKeysFromAction(const UInputAction* Action);

UFUNCTION(BlueprintCallable, Category = "Mapping")
UE_API void UnmapAll();
主要用于玩家自定义按键,源码上方的 TODO 注释也说了,这些是给按键设置界面用的。
IMC 不像 IA 那样会按玩家创建运行时实例。同样都是 DataAsset,为什么 IA 有实例而 IMC 没有?
因为 IA 有大量运行时状态,比如当前 Triggers 的状态、触发时间等,每个玩家需要独立保存;而 IMC 本质是配置数组,几乎没有运行时状态,所以没必要创建实例。(我笔记里原来写的理由是「IMC 没有构造函数」,这个不太对,UObject 被实例化时一定会构造。)
最后是数组里的元素 EnhancedActionKeyMapping,路径 Engine\Plugins\EnhancedInput\Source\EnhancedInput\Public\EnhancedActionKeyMapping.h:
UPROPERTY(EditAnywhere, Instanced, BlueprintReadWrite, Category = "Input")
TArray<TObjectPtr<UInputTrigger>> Triggers;

UPROPERTY(EditAnywhere, Instanced, BlueprintReadWrite, Category = "Input")
TArray<TObjectPtr<UInputModifier>> Modifiers;

UPROPERTY(EditAnywhere, BlueprintReadWrite, Category = "Input")
TObjectPtr<const UInputAction> Action = nullptr;

UPROPERTY(EditAnywhere, BlueprintReadWrite, Category = "Input")
FKey Key;
映射里最重要的就这几个成员。一条 Mapping 可以拥有自己的 Trigger 和 Modifier,前面说的”两层”就是从这儿来的。
看到这里,大概能感觉到 UE 的一种惯性设计:Asset 负责”描述数据”,Subsystem / Instance 负责”运行时管理”。
那当同一个客户端同时存在两个玩家操控角色,他们共用一套 IMC,其中一个玩家更改了键位,这时候如何避免混淆呢?这就要看 EnhancedInputSubsystems 了。
Subsystem 子系统
源码路径:Engine\Plugins\EnhancedInput\Source\EnhancedInput\Public\EnhancedInputSubsystems.h
// Per local player input subsystem
UCLASS(MinimalAPI)
class UEnhancedInputLocalPlayerSubsystem : public ULocalPlayerSubsystem, public IEnhancedInputSubsystemInterface
继承了LocalPlayer子系统。添加/移除 IMC 的接口就在它身上:
UE_API virtual void AddMappingContext(const UInputMappingContext* MappingContext, int32 Priority, const FModifyContextOptions& Options = FModifyContextOptions()) override;
UE_API virtual void RemoveMappingContext(const UInputMappingContext* MappingContext, const FModifyContextOptions& Options = FModifyContextOptions()) override;
而真正接收并处理玩家输入的对象是 UEnhancedPlayerInput,Subsystem 是从 LocalPlayer 的 PlayerController 身上把它取出来的:
UE_API virtual UEnhancedPlayerInput* GetPlayerInput() const override;所以,在官方示例里,给角色实例添加IMC之前,中间隔了一个EnhancedInputLocalPlayerSubsystem。
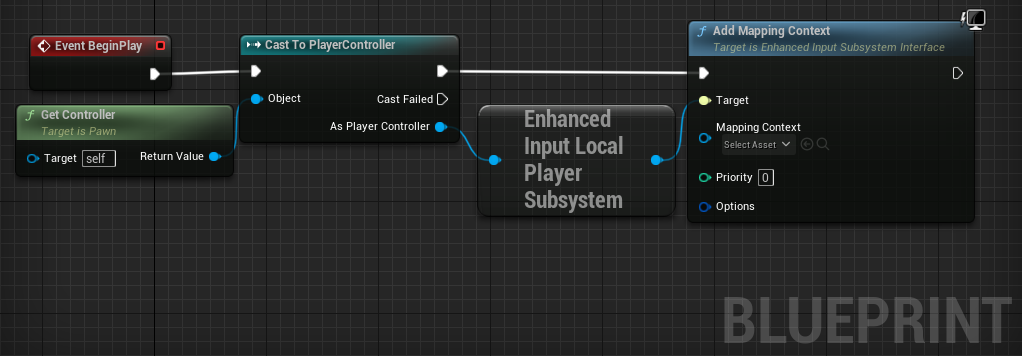
5.6 的第三人称 C++ 模板里,这一步放在了 PlayerController 的 SetupInputComponent():
void AMyDemoPlayerController::SetupInputComponent()
{
    Super::SetupInputComponent();

    // only add IMCs for local player controllers
    if (IsLocalPlayerController())
    {
        if (UEnhancedInputLocalPlayerSubsystem* Subsystem =
            ULocalPlayer::GetSubsystem<UEnhancedInputLocalPlayerSubsystem>(GetLocalPlayer()))
        {
            for (UInputMappingContext* CurrentContext : DefaultMappingContexts)
            {
                Subsystem->AddMappingContext(CurrentContext, 0);
            }
            // ...
        }
    }
}
也就是说,实际控制每个LocalPlayer的是这个Subsystem,并非IMC;
而这个Subsystem会在游戏运行期间实时构建,每个玩家独立。
另外,EnhancedInputSubsystems 里其实有两个类:
- UEnhancedInputLocalPlayerSubsystem:用于本地玩家,也就是有 PlayerController 的那个角色。
- UEnhancedInputWorldSubsystem:用于 World 里面没有 PlayerController 的 Actor,比方说按下特定组合按键才能解锁的门。这个例子就是引擎注释里的,5.6 里这个类还标着 Experimental。
启动到回调的梳理
最后梳理一下游戏开始,到接收到输入的整个流程:
- 游戏开始
- 创建LocalPlayer
- 创建EnhancedInputLocalPlayerSubsystem,给到对应的LocalPlayer
- 角色 BeginPlay(C++ 模板里是 PlayerController 的 SetupInputComponent)
- 获取 EnhancedInputLocalPlayerSubsystem
- Add Mapping Context(IMC)
- Subsystem 根据 IMC 构建输入映射
- 玩家按键
- 触发 IA
- BindAction 回调
到 BindAction 回调这一步,输入就交到角色手里了。C++ 里的绑定写在 Character 的 SetupPlayerInputComponent 里,以我自己的Demo工程为例:
if (UEnhancedInputComponent* EIC = Cast<UEnhancedInputComponent>(PlayerInputComponent))
{
    EIC->BindAction(MoveAction, ETriggerEvent::Triggered, this, &AGymCharacter::Move);
    EIC->BindAction(JumpAction, ETriggerEvent::Started,   this, &AGymCharacter::Jump);
    EIC->BindAction(JumpAction, ETriggerEvent::Completed, this, &AGymCharacter::StopJumping);
}
Move 绑的是 Triggered。IA_Move 没配 Trigger,按住就每帧 Triggered,所以 Move 每帧都会被调;Jump 是按下开始、松开停止,所以 Started 和 Completed 各绑一条。前面那堆触发状态,到这里就用上了。
角色移动
Pawn 与 Character
Pawn增加 CharacterMovementComponent、CapsuleComponent 和 SkeletalMeshComponent这三个组件之后,就是Character。
- 角色移动组件,可以使得角色不通过物理手段影响,即可运动,为角色特定。
- 胶囊体组件用于角色运动碰撞,默认是垂直的胶囊体。
- 骨骼网格体组件,可以使得角色启用高级的骨骼动画。
那什么又是Pawn?
Pawn 是那些可由玩家或 AI 控制的所有 Actor 的基类。
它有一个子类 DefaultPawn(和 Character 是平级的);
DefaultPawn 类包含了原生的:
- UFloatingPawnMovement 移动组件、
- 球形 CollisionComponent 组件、
- 以及一个 StaticMeshComponent 组件(是不是和Character很相似?)
SpectatorPawn 又是 DefaultPawn 的子类,常用于实现观看功能,暂不展开讨论。
Pawn 层只负责攒输入
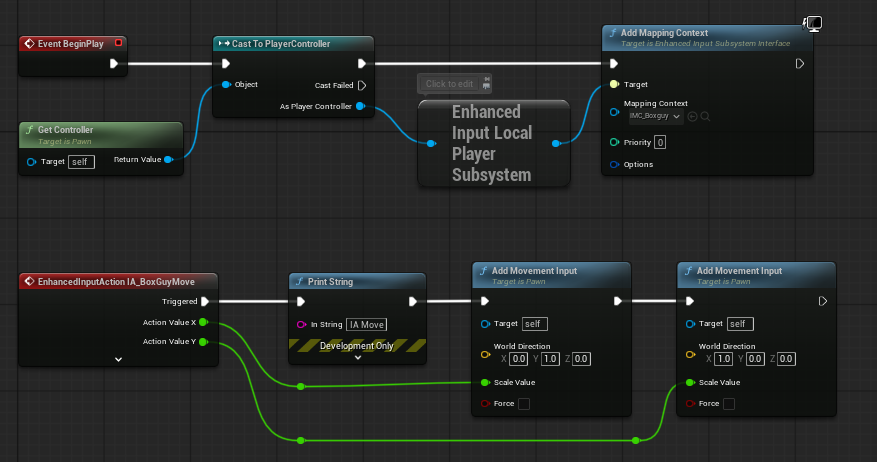
如图是我的角色蓝图,
上面为这个角色挂载了增强输入,并且添加了默认的IMC,下面则是相应IMC里的IA,实现了角色移动。
而角色移动似乎与Add Movement Input有关系,咱们可以从这个蓝图节点作为切入口,了解CMC是怎么处理输入,最终操控角色移动的。
根据AI大人的说法,Add Movement Input节点其实是由Pawn提供的,其作用只是接收输入,并且保存起来。
而CMC读取了保存起来的这些输入,并真正移动起来了角色。
这也是 UE 设计的一个优雅之处:输入接收(Pawn 层) 和 输入执行(Movement Component 层) 是分离的。这样不同的 Pawn 子类可以用不同的移动组件,但都能通过 AddMovementInput 这个统一的接口接收输入。
目前可以把流程理解成这样:
IA_Move 触发 →
AddMovementInput(APawn) →
ControlInputVector(APawn内部暂存) →
CMC Tick(读取这个向量) →
真正执行移动
下面对着源码验证一下这个说法。Pawn 源码这里只看 AddMovementInput,先看注释:
/**
 * Add movement input along the given world direction vector (usually normalized) scaled by 'ScaleValue'. If ScaleValue < 0, movement will be in the opposite direction.
 * Base Pawn classes won't automatically apply movement, it's up to the user to do so in a Tick event. Subclasses such as Character and DefaultPawn automatically handle this input and move.
 *
 * @param WorldDirection	Direction in world space to apply input
 * @param ScaleValue		Scale to apply to input. This can be used for analog input, ie a value of 0.5 applies half the normal value, while -1.0 would reverse the direction.
 * @param bForce			If true always add the input, ignoring the result of IsMoveInputIgnored().
 * @see GetPendingMovementInputVector(), GetLastMovementInputVector(), ConsumeMovementInputVector()
 */
UFUNCTION(BlueprintCallable, Category="Pawn|Input", meta=(Keywords="AddInput"))
ENGINE_API virtual void AddMovementInput(FVector WorldDirection, float ScaleValue = 1.0f, bool bForce = false);
注释已经明确告知,基础 Pawn 类不会因为添加移动输入而自动移动,需要在 Tick 事件中手动处理;而 Character 和 DefaultPawn 类则可以自动处理这些输入并移动。
末尾 @see 的那三个函数,GetPendingMovementInputVector()、GetLastMovementInputVector()、ConsumeMovementInputVector(),就是后面处理输入要用到的。
然后看下实现:
void APawn::AddMovementInput(FVector WorldDirection, float ScaleValue, bool bForce)
{
    UPawnMovementComponent* MovementComponent = GetMovementComponent();
    if (MovementComponent)
    {
        MovementComponent->AddInputVector(WorldDirection * ScaleValue, bForce);
    }
    else
    {
        Internal_AddMovementInput(WorldDirection * ScaleValue, bForce);
    }
}
先确认自己身上有没移动组件MovementComponent,
如果有,则直接将方向、输入强度数据打包丢给移动组件;
若没有,则直接自己暂存起来。
接着看接收移动输入的移动组件 PawnMovementComponent,同样先看注释:
/**
 * Adds the given vector to the accumulated input in world space. Input vectors are usually between 0 and 1 in magnitude.
 * They are accumulated during a frame then applied as acceleration during the movement update.
 *
 * @param WorldVector		Direction in world space to apply input
 * @param bForce			If true always add the input, ignoring the result of IsMoveInputIgnored().
 * @see APawn::AddMovementInput()
 */
UFUNCTION(BlueprintCallable, Category="Pawn|Components|PawnMovement")
ENGINE_API virtual void AddInputVector(FVector WorldVector, bool bForce = false);
同一帧内,会将所有的输入向量累积起来,然后在移动更新的时候作为”加速度”被应用。
(为何是加速度,为何输入向量通常是0到1?这个后面读到 CMC 的时候有答案。)
实现只是做了转发动作:
void UPawnMovementComponent::AddInputVector(FVector WorldAccel, bool bForce)
{
    if (PawnOwner)
    {
        PawnOwner->Internal_AddMovementInput(WorldAccel, bForce);
    }
}
先确认这个组件有没有所属的Pawn(PawnOwner),
然后将输入向量丢回给这个Pawn的Internal_AddMovementInput方法。
也就是说,不管有没有移动组件,最后都会走到同一个地方。
void APawn::Internal_AddMovementInput(FVector WorldAccel, bool bForce)
{
    if (bForce || !IsMoveInputIgnored())
    {
        ControlInputVector += WorldAccel;
    }
}
而 Internal_AddMovementInput 就更简单了:先确认当前的 Pawn 是不是可以移动的状态,如果是的话,直接将输入向量累计到 ControlInputVector。ControlInputVector 就是 Pawn 暂存玩家输入的地方,等待被移动组件统一消费。
攒完之后是消费。
CMC 更新时会调用 ConsumeInputVector 方法,它同样是个转发,最终落到 Pawn 的 Internal_ConsumeMovementInputVector:
FVector UPawnMovementComponent::ConsumeInputVector()
{
    return PawnOwner ? PawnOwner->Internal_ConsumeMovementInputVector() : FVector::ZeroVector;
}
FVector APawn::Internal_ConsumeMovementInputVector()
{
LastControlInputVector = ControlInputVector;
ControlInputVector = FVector::ZeroVector;
return LastControlInputVector;
}这个方法将当前暂存的输入向量更新到 LastControlInputVector,再把 ControlInputVector 清零,最后将 LastControlInputVector 返回给调用它的移动组件。清零可以防止输入跨帧累积。
所以说,Pawn 实际上从头到尾都没有进行角色移动,只是将移动意图(输入强度、方向)累计起来,最终成为一个加速度,传递到 MovementComponent。
题外话:我原以为,有些游戏暂停期间没有禁用玩家输入,恢复游戏后角色瞬移,原因就是累积了大量待处理输入,恢复游戏后 CMC 一次性消费掉了大量输入。
后来读下去发现至少有两处挡着这件事:一是下面会讲到的 ScaleInputAcceleration 会先把输入长度修正到1以内,攒得再多也只等于推满一次摇杆;二是暂停时,只要 IA 没勾 bTriggerWhenPaused(默认 false),触发状态会被强制置成 None,回调根本不会被调用,也就攒不了输入。
最后把这一段的链路梳理一下:
IA_Move 触发
↓
APawn::AddMovementInput
↓ (如果有 MovementComponent)
UPawnMovementComponent::AddInputVector
↓
APawn::Internal_AddMovementInput
↓ (存储到 Pawn 内部)
ControlInputVector 变量
↓ (同一帧稍后,CMC Tick 时)
UPawnMovementComponent::ConsumeInputVector()
↓
应用为加速度
↓
角色移动
这里我笔记原本写的是「下一帧 CMC Tick 时」,实际是同一帧。Controller 控制 Pawn 的时候,会给移动组件的 Tick 加一个前置依赖(AController::AddPawnTickDependency),所以 PlayerController 先处理完输入,同一帧里 CMC 才 Tick。
Pawn 层的职责到此为止,下面是移动组件层相关的内容。
输入变成加速度
进入 CMC,源码在 Engine\Source\Runtime\Engine\Private\Components\CharacterMovementComponent.cpp。
接下来看调用了 ConsumeInputVector 的 TickComponent 函数,TickComponent 一开头就把输入取走了:
void UCharacterMovementComponent::TickComponent(float DeltaTime, enum ELevelTick TickType, FActorComponentTickFunction *ThisTickFunction)
{
    // ...
    FVector InputVector = FVector::ZeroVector;
    bool bUsingAsyncTick = (CharacterMovementCVars::AsyncCharacterMovement == 1) && IsAsyncCallbackRegistered();
    if (!bUsingAsyncTick)
    {
        // Do not consume input if simulating asynchronously, we will consume input when filling out async inputs.
        InputVector = ConsumeInputVector();
    }
    // ...
            ControlledCharacterMove(InputVector, DeltaTime);
    // ...
}
TickComponent 函数拿走了输入,传给了 ControlledCharacterMove 函数:
void UCharacterMovementComponent::ControlledCharacterMove(const FVector& InputVector, float DeltaSeconds)
{
    {
        SCOPE_CYCLE_COUNTER(STAT_CharUpdateAcceleration);

        CharacterOwner->CheckJumpInput(DeltaSeconds);

        // apply input to acceleration
        Acceleration = ScaleInputAcceleration(ConstrainInputAcceleration(InputVector));
        AnalogInputModifier = ComputeAnalogInputModifier();
    }

    if (CharacterOwner->GetLocalRole() == ROLE_Authority)
    {
        PerformMovement(DeltaSeconds);
    }
    else if (CharacterOwner->GetLocalRole() == ROLE_AutonomousProxy && IsNetMode(NM_Client))
    {
        ReplicateMoveToServer(DeltaSeconds, Acceleration);
    }
}
ControlledCharacterMove 是 CMC 真正开始处理玩家输入的地方,玩家输入的移动向量会在这里被处理,转变为加速度 Acceleration。
Acceleration 是 CMC 最核心的变量之一,表示这一帧角色的加速度,后续的移动计算都会基于这个加速度来进行。
前面留的那个问题,为何是加速度,为何输入向量通常是 0 到 1,答案就在 ScaleInputAcceleration 里:
FVector UCharacterMovementComponent::ScaleInputAcceleration(const FVector& InputAcceleration) const
{
    return GetMaxAcceleration() * InputAcceleration.GetClampedToMaxSize(1.0f);
}
先把输入向量的长度夹到 1 以内,当作 0 到 1 的「强度」,再乘上最大加速度。所以输入向量本身不是加速度,而是加速度的比例。
外面那层 ConstrainInputAcceleration 则是在走路或下落时,把输入里沿重力方向的分量去掉,地面上推摇杆,不该推出一个向上的加速度。
加速度变成速度
接下来是看这个加速度如何变成速度的,也就是CalcVelocity函数,
这个函数是计算角色的速度的核心逻辑,包括了加速度、摩擦力、制动减速度等因素的综合计算。它会根据当前的运动模式和输入来更新角色的速度向量。
简单来说,这个函数负责算出,角色在这一帧的速度向量。
与玩家移动相关的代码其实只有这些(节选):
const bool bZeroAcceleration = Acceleration.IsZero();
const bool bVelocityOverMax = IsExceedingMaxSpeed(MaxSpeed);

// 没有输入 -> 减速
if ((bZeroAcceleration && bZeroRequestedAcceleration) || bVelocityOverMax)
{
    ApplyVelocityBraking(...);
}
// 有输入 -> 修正速度方向
else if (!bZeroAcceleration)
{
    Velocity =
        Velocity -
        (Velocity - AccelDir * VelSize)
        * FMath::Min(DeltaTime * Friction, 1.f);
}

// 根据加速度更新速度 ⭐⭐⭐⭐⭐
if (!bZeroAcceleration)
{
    Velocity += Acceleration * DeltaTime;

    // 限制最大速度
    Velocity = Velocity.GetClampedToMaxSize(NewMaxInputSpeed);
}
加速度应用到速度上的关键就是最后那段:
新的速度 = 当前速度 + 加速度 × 时间间隔,然后夹到最大速度以内。
StartNewPhysics 与 PhysWalking
顺着数据流继续往下,接下来是看看算出来的Velocity,是如何变成实际位移的,来到Phys系列相关函数,这些都是实际让角色产生位移的函数。
CMC会根据当前角色状态调用不同的Phys函数,其中PhysWalking地面移动是最常用也最重要的一个。选择使用不同的移动状态的函数是StartNewPhysics,这个函数会在PerformMovement这个超大函数中被调用。
头文件里 PerformMovement 旁边是这么写的:
// Movement functions broken out based on owner's network Role.
// TickComponent calls the correct version based on the Role.
// These may be called during move playback and correction during network updates.
//

/** Perform movement on an autonomous client */
ENGINE_API virtual void PerformMovement(float DeltaTime);

/** Special Tick for Simulated Proxies */
ENGINE_API virtual void SimulatedTick(float DeltaSeconds);

/** Simulate movement on a non-owning client. Called by SimulatedTick(). */
ENGINE_API virtual void SimulateMovement(float DeltaTime);
CMC里的三个主要的移动函数,主要关注本地玩家与服务端调用的PerformMovement。
光是这一个函数的实现就有接近四百行…先跳过吧,把PerformMovement理解为CMC的统一调度中心即可。
所以实际的逻辑链是这样的:
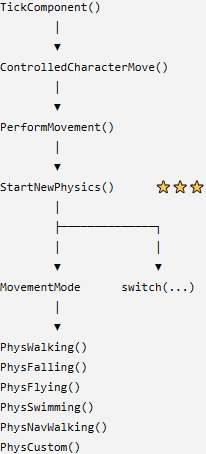
那看实际的PhysWalking之前,我们也速览一眼StartNewPhysics:
switch ( MovementMode )
{
case MOVE_None:
    break;
case MOVE_Walking:
    PhysWalking(deltaTime, Iterations);
    break;
case MOVE_NavWalking:
    PhysNavWalking(deltaTime, Iterations);
    break;
case MOVE_Falling:
    PhysFalling(deltaTime, Iterations);
    break;
case MOVE_Flying:
    PhysFlying(deltaTime, Iterations);
    break;
case MOVE_Swimming:
    PhysSwimming(deltaTime, Iterations);
    break;
case MOVE_Custom:
    PhysCustom(deltaTime, Iterations);
    break;
default:
    // ...
    break;
}
核心其实就是中间那一大段Switch代码,针对当前不同状态,调用对应的Phys函数,就这么简单。
终于来到了实际移动角色的Phys函数,这里以最重要的PhysWalking作为阅读例子。函数的前半部分,是一些前置检查,以及初始化变量;核心是一段while循环,所有的移动会在while循环里发生;
while循环里的前半部分依旧是一些逻辑检查,以及变量初始化。循环每一次只处理一小段时间,这就是子步:
const float timeTick = GetSimulationTimeStep(remainingTime, Iterations);
remainingTime -= timeTick;
一堆判断都通过之后,先用 CalcVelocity 算出这一小段的速度,真正让角色在地面移动的函数是MoveAlongFloor:
CalcVelocity(timeTick, GroundFriction, false, GetMaxBrakingDeceleration());
// ...
MoveAlongFloor(MoveVelocity, timeTick, &StepDownResult);
移动结束之后,依旧是一段状态检查,以及一些边缘检测和掉落处理。
循环的末尾有一段更新实际速度的代码也值得一看,根据实际产生的位移,计算出角色的实际速度,并且将实际速度赋值给理论速度Velocity,这样可以保持速度与实际移动一致:
// Make velocity reflect actual move
if( !bJustTeleported && !HasAnimRootMotion() && !CurrentRootMotion.HasOverrideVelocity() && timeTick >= MIN_TICK_TIME)
{
    Velocity = (UpdatedComponent->GetComponentLocation() - OldLocation) / timeTick;
    MaintainHorizontalGroundVelocity();
}
MoveAlongFloor 到实际移动
继续往下看真正让角色移动的函数MoveAlongFloor,这个函数会在明确知道角色可以在地面移动时被调用。
它会使用当前的地面信息(CurrentFloor)和计算出的地面移动增量(ComputeGroundMovementDelta())来获取移动方向。
也会做一些不同地面的处理,如果碰到第二个可行走的表面,也会使用相同的方法进行移动。
对这个代码做一下简化,其实大概框架就是如下:
MoveAlongFloor()
{
    // 根据坡度计算真正移动方向
    RampVector =
        ComputeGroundMovementDelta(...);

    // 真正移动 Capsule
    SafeMoveUpdatedComponent(...);

    // 撞东西?
    if (Hit)
    {
        // 能上台阶?
        StepUp();

        // 不行就滑墙
        SlideAlongSurface();
    }
}
继续往下深挖,执行移动的函数SafeMoveUpdatedComponent。
它在CMC的基类MovementComponent里(继承链是 CMC → PawnMovementComponent → NavMovementComponent → MovementComponent),先看头文件注释:
/**
 * Calls MoveUpdatedComponent(), handling initial penetrations by calling ResolvePenetration().
 * If this adjustment succeeds, the original movement will be attempted again.
 * @note The overload taking rotation as an FQuat is slightly faster than the version using FRotator (which will be converted to an FQuat).
 * @note The 'Teleport' flag is currently always treated as 'None' (not teleporting) when used in an active FScopedMovementUpdate.
 * @return result of the final MoveUpdatedComponent() call.
 */
ENGINE_API bool SafeMoveUpdatedComponent(const FVector& Delta, const FQuat& NewRotation,    bool bSweep, FHitResult& OutHit, ETeleportType Teleport = ETeleportType::None);
调用MoveUpdatedComponent执行移动,并且使用ResolvePenetration处理初始穿模;
如果处理穿模成功,则重新尝试移动;
还有一些Rotator、Quat相关的重载,暂时跳过。速看一眼实现,其实也是很简单的Wrapper包装器逻辑:
bMoveResult = MoveUpdatedComponent(Delta, NewRotation, bSweep, &OutHit, Teleport);
// ...
// Handle initial penetrations
if (OutHit.bStartPenetrating && UpdatedComponent)
{
    const FVector RequestedAdjustment = GetPenetrationAdjustment(OutHit);
    if (ResolvePenetration(RequestedAdjustment, OutHit, NewRotation))
    {
        // Retry original move
        bMoveResult = MoveUpdatedComponent(Delta, NewRotation, bSweep, &OutHit, Teleport);
    }
}
return bMoveResult;
继续看MoveUpdatedComponent,先是头文件:
/**
 * Moves our UpdatedComponent by the given Delta, and sets rotation to NewRotation. Respects the plane constraint, if enabled.
 * @note This simply calls the virtual MoveUpdatedComponentImpl() which can be overridden to implement custom behavior.
 * ...
 * @return True if some movement occurred, false if no movement occurred. Result of any impact will be stored in OutHit.
 */
bool MoveUpdatedComponent(const FVector& Delta, const FQuat& NewRotation,    bool bSweep, FHitResult* OutHit = NULL, ETeleportType Teleport = ETeleportType::None);
调用MoveUpdatedComponentImpl执行移动,可以说又是一个Wrapper;
Impl = Implementation,也就是真正的实现。
返回值return True if movement occurred。
速览一眼实现,其实啥都没干,是内联到头文件的函数:
FORCEINLINE_DEBUGGABLE bool UMovementComponent::MoveUpdatedComponent(const FVector& Delta, const FQuat& NewRotation, bool bSweep, FHitResult* OutHit, ETeleportType Teleport)
{
    return MoveUpdatedComponentImpl(Delta, NewRotation, bSweep, OutHit, Teleport);
}
继续看MoveUpdatedComponentImpl:
bool UMovementComponent::MoveUpdatedComponentImpl( const FVector& Delta, const FQuat& NewRotation, bool bSweep, FHitResult* OutHit, ETeleportType Teleport)
{
    if (UpdatedComponent)
    {
        const FVector NewDelta = ConstrainDirectionToPlane(Delta);
        return UpdatedComponent->MoveComponent(NewDelta, NewRotation, bSweep, OutHit, MoveComponentFlags, Teleport);
    }

    return false;
}
调用了MoveComponent,这是UE里所有SceneComponent的统一移动接口。
对于Character来说,就是移动CapsuleComponent的意思;而Mesh又是Attach在CapsuleComponent上,最终的视觉效果就是小人模型终于在场景里动起来了。
所以,CMC到此为止了,继续深入的话,就是UpdatedComponent / Chaos相关的内容,那是UE底层碰撞系统相关的内容,不再是CMC了。
整条链路
简要总结整个 CMC 主线:
玩家输入 → Pawn 缓存输入 → CMC 消费输入 → 转换为加速度 → 计算速度 → 计算位移 → 移动 Capsule。
玩家按键(Enhanced Input)
AddMovementInput()                 // Pawn 接收移动输入
AddInputVector()
ControlInputVector                 // Pawn 暂存本帧输入
TickComponent()                    // CMC 每帧更新
ConsumeInputVector()               // 消费输入
ControlledCharacterMove()
Acceleration                       // 输入 → 加速度
CalcVelocity()                     // 加速度 → 速度
StartNewPhysics()                  // 根据 MovementMode 选择物理函数
PhysWalking()                      // 行走模式
MoveAlongFloor()                   // 根据速度计算本帧位移
SafeMoveUpdatedComponent()
MoveUpdatedComponent()
MoveUpdatedComponentImpl()
CapsuleComponent::MoveComponent()  // 真正移动角色
(这张是按「数据怎么变」排的,不是严格的调用顺序:严格来说 CalcVelocity 是在 PhysWalking 的循环里被调用的。)
一些小疑虑
读完这一遍,没想明白的地方大概有这些,先记在这儿。
前面那个问题:同一个客户端两个本地玩家共用一套 IMC,其中一个改了键位,怎么避免混淆?Subsystem 和 IA 实例都是每个玩家一份,这个我知道了,但改键位存在哪、怎么按玩家区分,方向大概在 IA 上的 PlayerMappableKeySettings 和 UEnhancedInputUserSettings 那边,这两个我还没读。
PerformMovement 接近四百行,这次整个当黑盒跳过了。它和 StartNewPhysics 之间具体做了什么,现在还说不出来。
子步 / Time Step / DeltaTime,只知道有这回事,更细节的东西也不太了解。
还有整个网络那一侧。ControlledCharacterMove 里 ROLE_AutonomousProxy 走的是 ReplicateMoveToServer,这一整条分支我完全没碰,这篇里走的都是 Authority 那一条。